

Humans are visual creatures. This is reflected in the large amount of brain tissue that is dedicated to the analysis of images and the importance of seeing in daily life.
–The Cognitive Neurosciences, Michael S. Gazzaniga – pg. 1108
A while ago, I came across a YouTube video that briefly outlines a method for memorizing all of the guitar notes down the entire fretboard in standard tuning (EADGBE). I kept having to pause on particular images and felt the lesson didn’t spend enough time explicating just how useful this method is. Below is the complete lesson – feel free to use the guitar tuning app (new window) before continuing.
Just Beginning or Tuning Up?
Doesn’t matter – this method will help you in a number of ways. It’s not dry theory, and it’s not generic scales. We are going to learn the positions of ALL of the notes on your guitar, the positions of each note’s octaves, and the dexterity and accuracy to hit any note on your fretboard at whatever speed you command.
You can use it as a practice routine, and it’s applicable to standard tuning and any stepped down/up tuning.
Visualizing Guitar Notes & Patterns is Natural
In the capacitor guide, I mentioned that when discussing pickup induction or acoustic resonance, your mind will immediately imagine sound waves in action to try to build a visual understanding, rather than the math and physics behind it.
This is especially true for learning. Our brains have a preference for visual input, can decimate and comprehend imagery much faster, and will seek to visualize or find patterns in data presented to us. This is why I find this method to be so useful because it’s going to lay a solid foundation and a frame of reference for all of the terribly boring theory lessons that no one has ever been excited for…ever.
The Lesson
Part I: Breaking Down the Fretboard
This is your guitar’s fretboard broken down into its individual notes (chromatic scale):
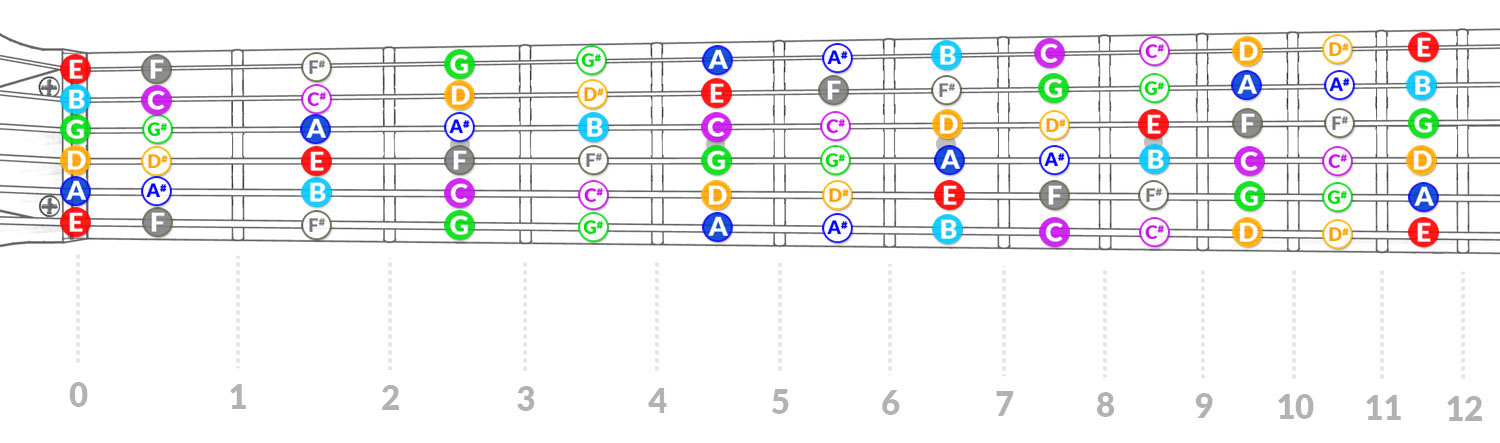

Looking at that is entirely useless, and it can be daunting to think that you’ll have to commit this to memory. But when we break down all of the instances of a single note, we get something much more manageable:
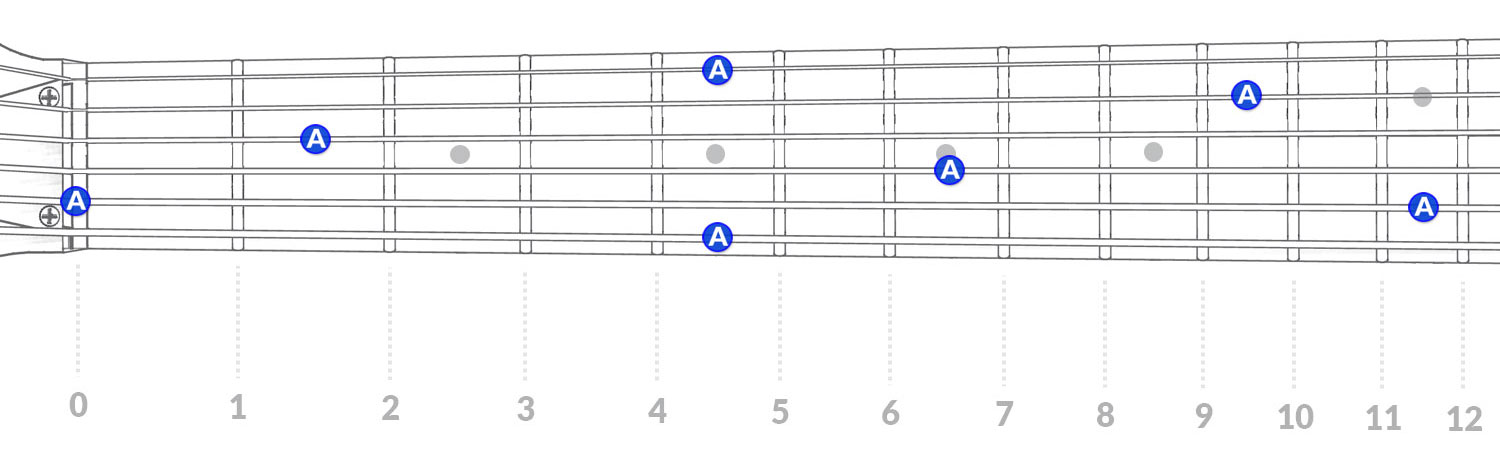

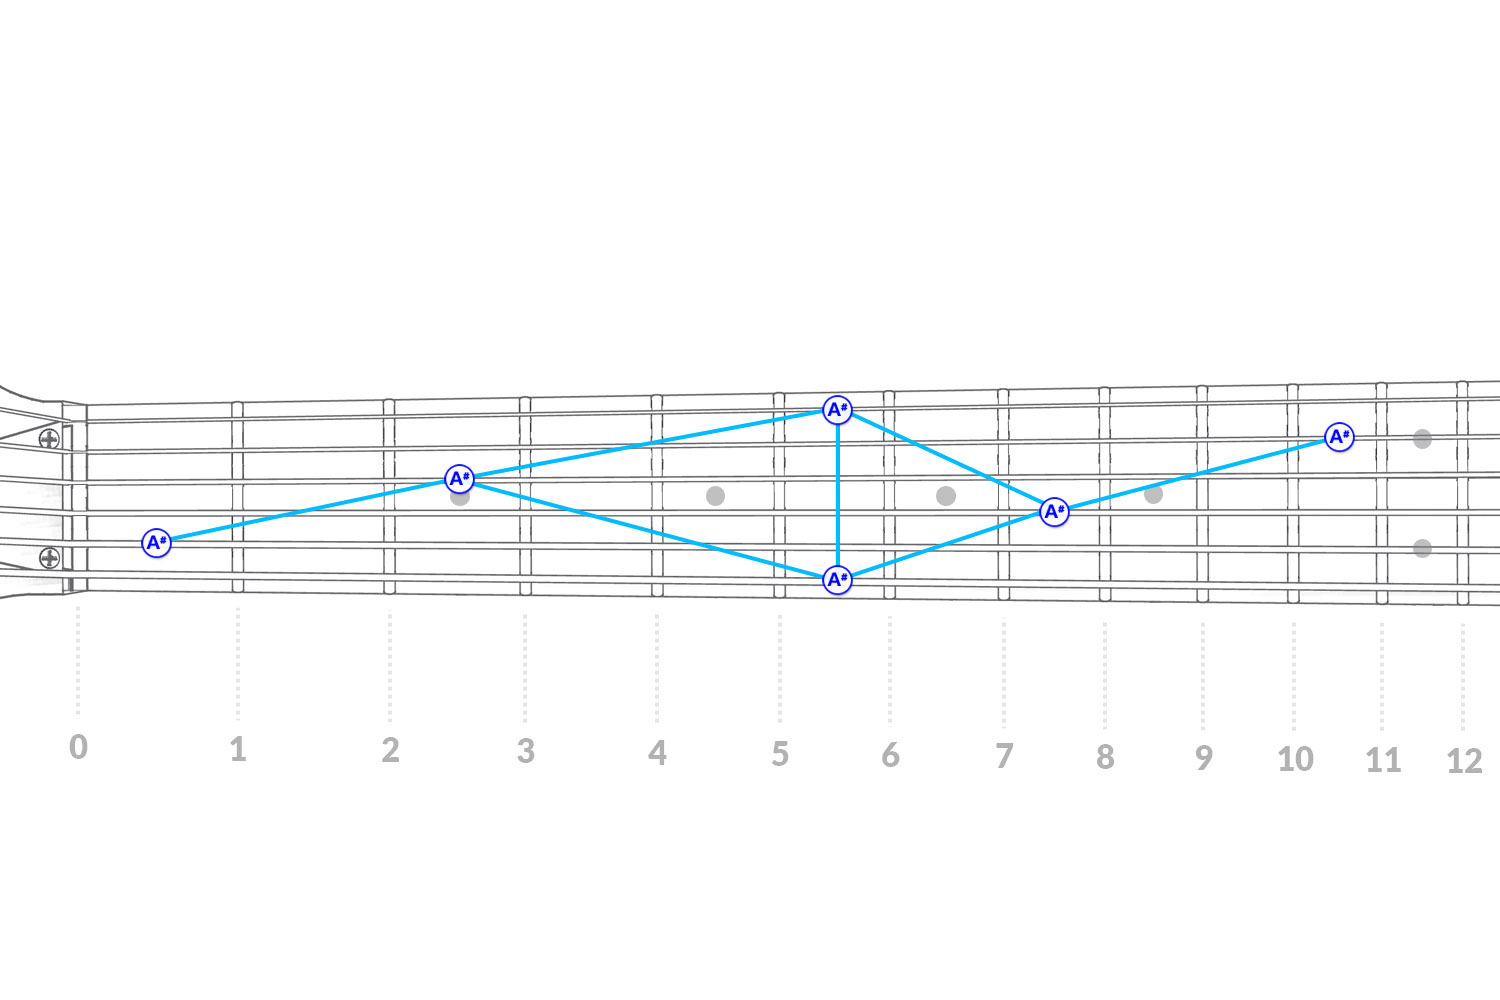
Now we have all of the octave positions of A across the entire fretboard (the same positions apply to the next 12 frets). But we still have to find a better way to memorize the positions and be able to relate them to the other notes. Knowing that all guitar notes (and any instrument really) have sharps apart from B and E, let’s just see where they might be in relation to their roots:
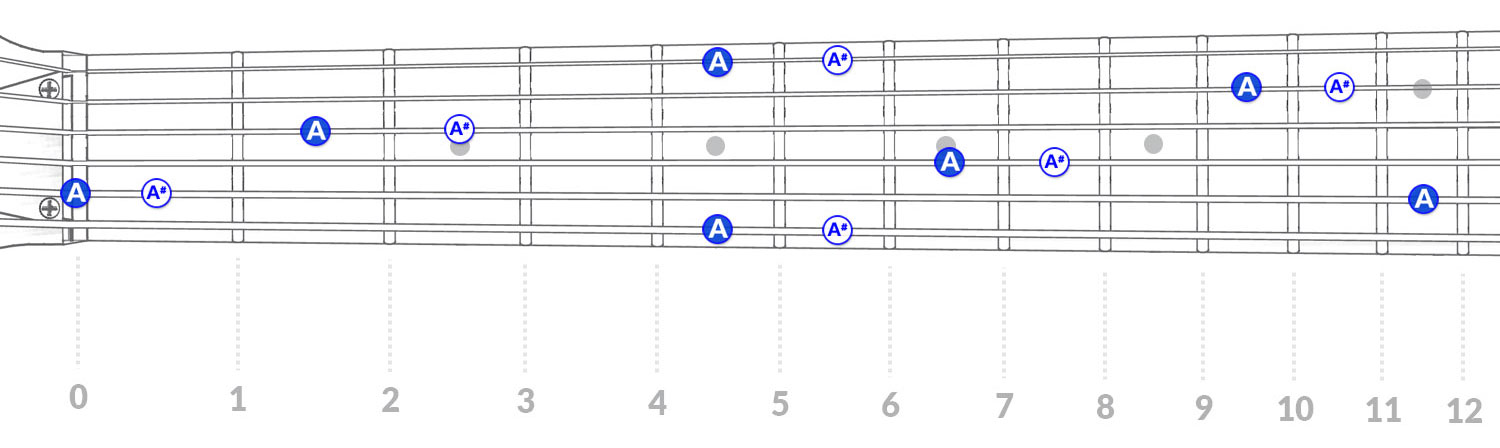

That was a stupid example, but it’s the first step in an emerging pattern. What comes after A#?
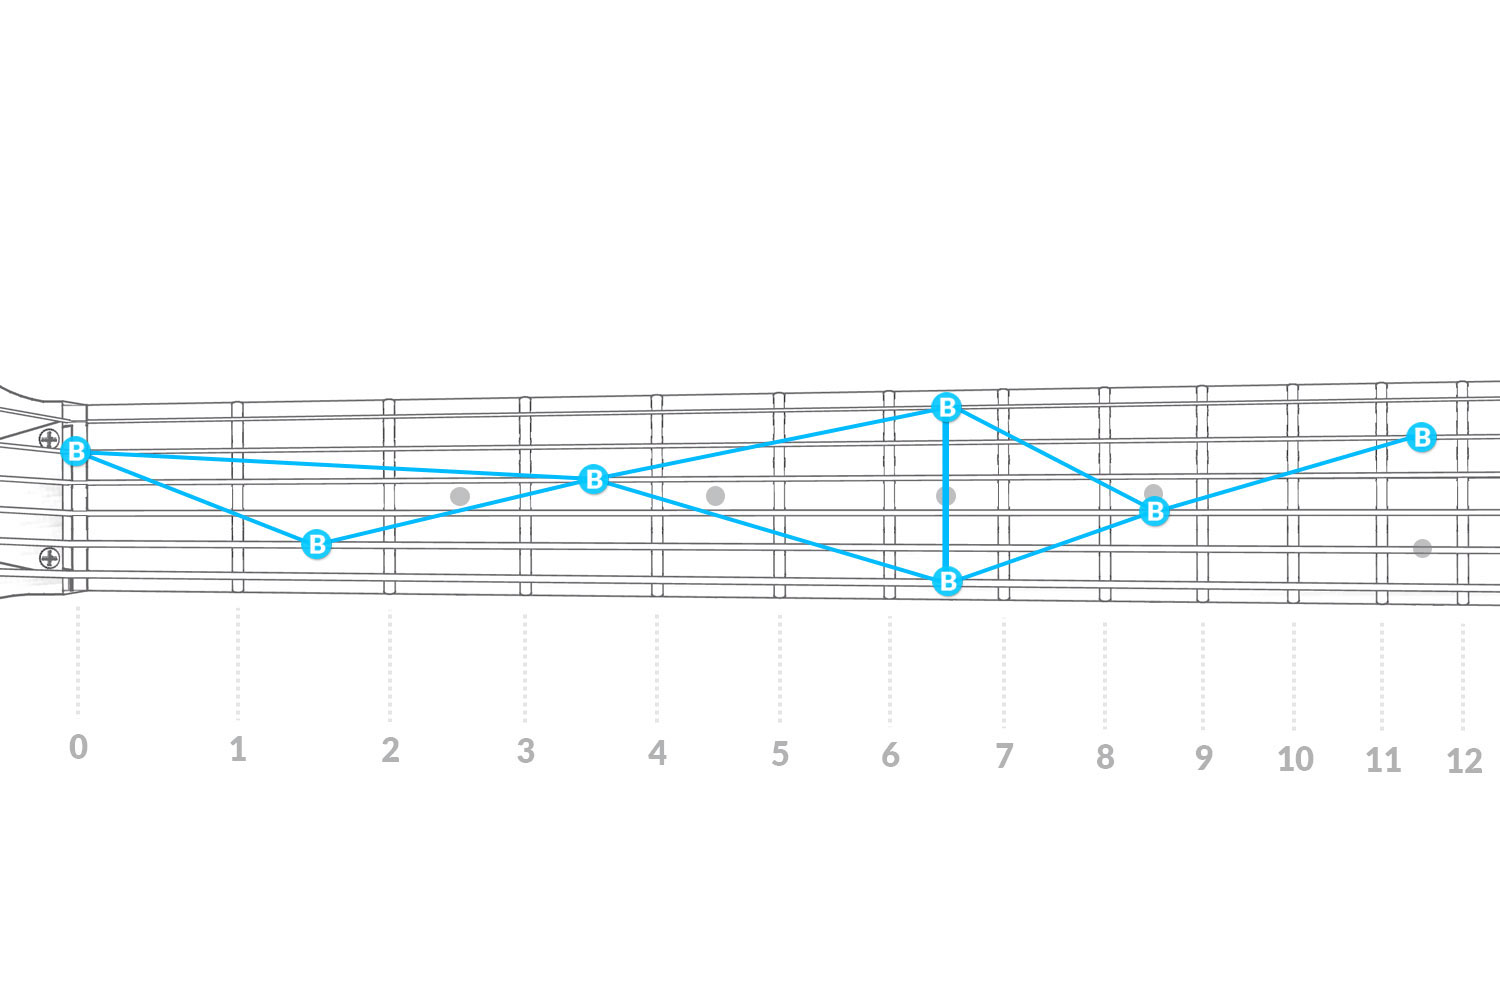
A, A#, B, C, C#, D, D#, E, F, F#, G, G#, repeat….
Let’s look at where that appears:
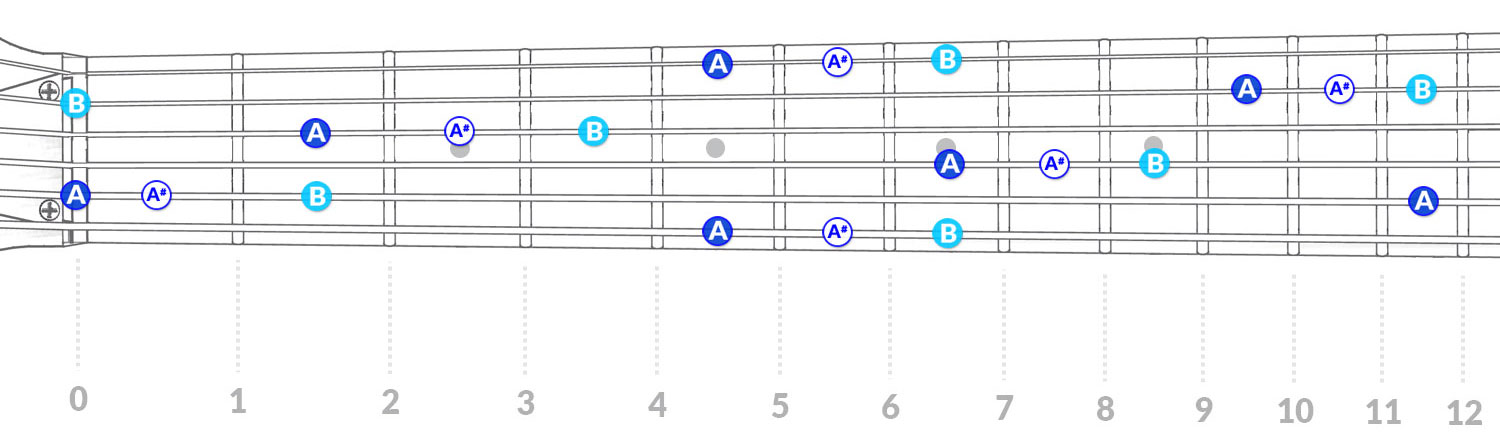

Now we can definitely see how that monstrosity of a chromatic scale is taking shape, and we can see how the notes are related to each other…but how can I commit these positions to memory?
Part II: Patterns & Shapes
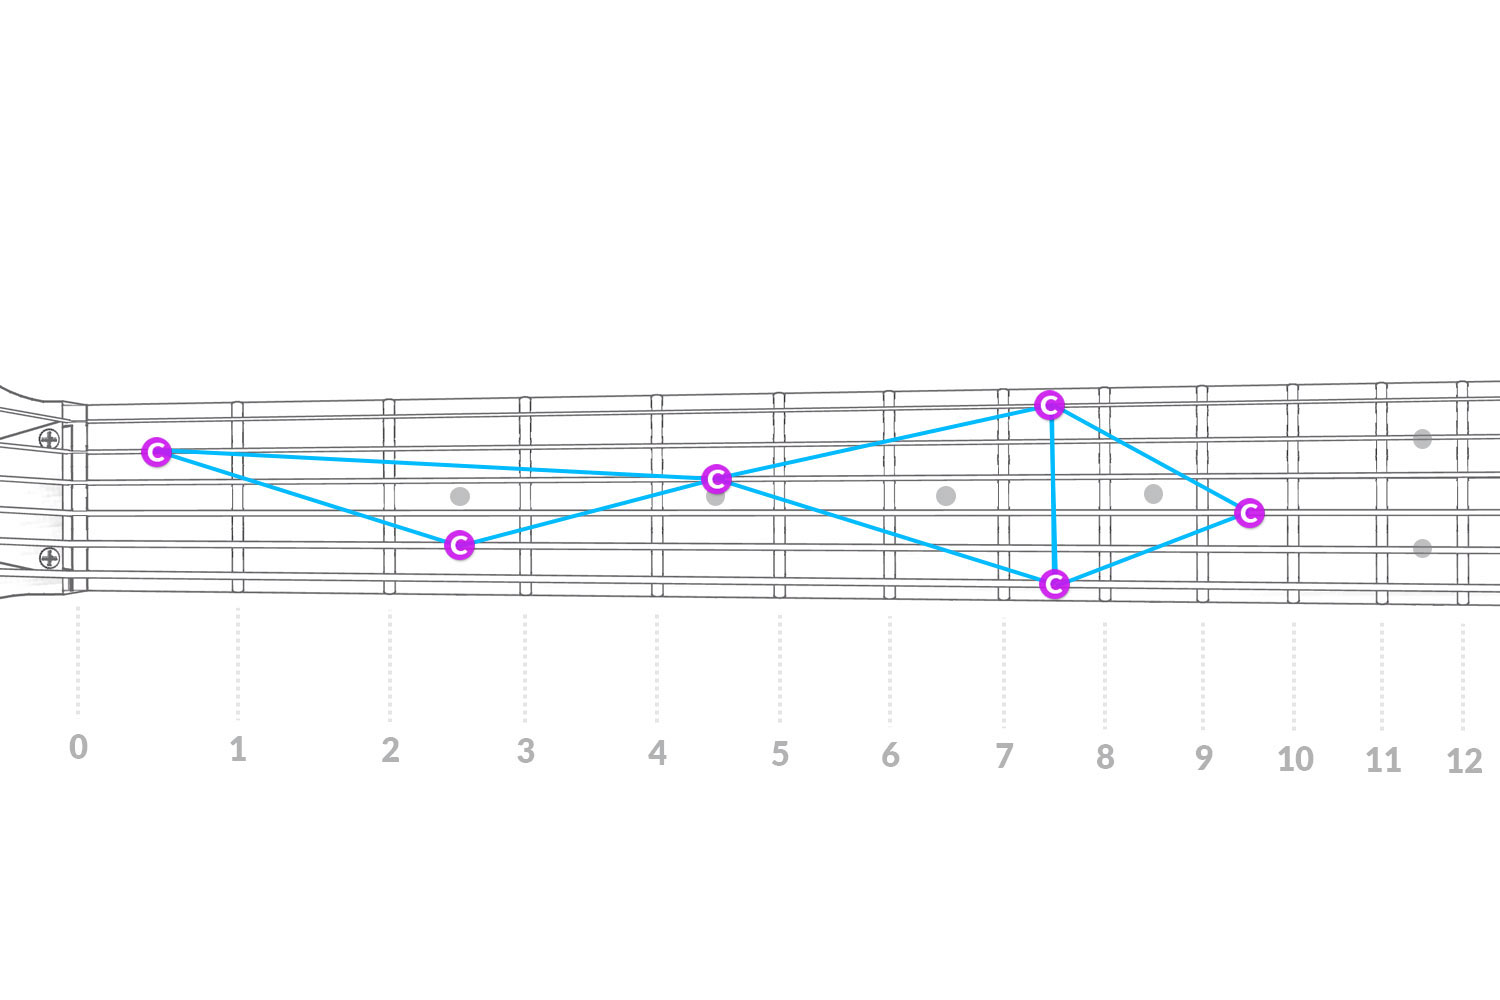
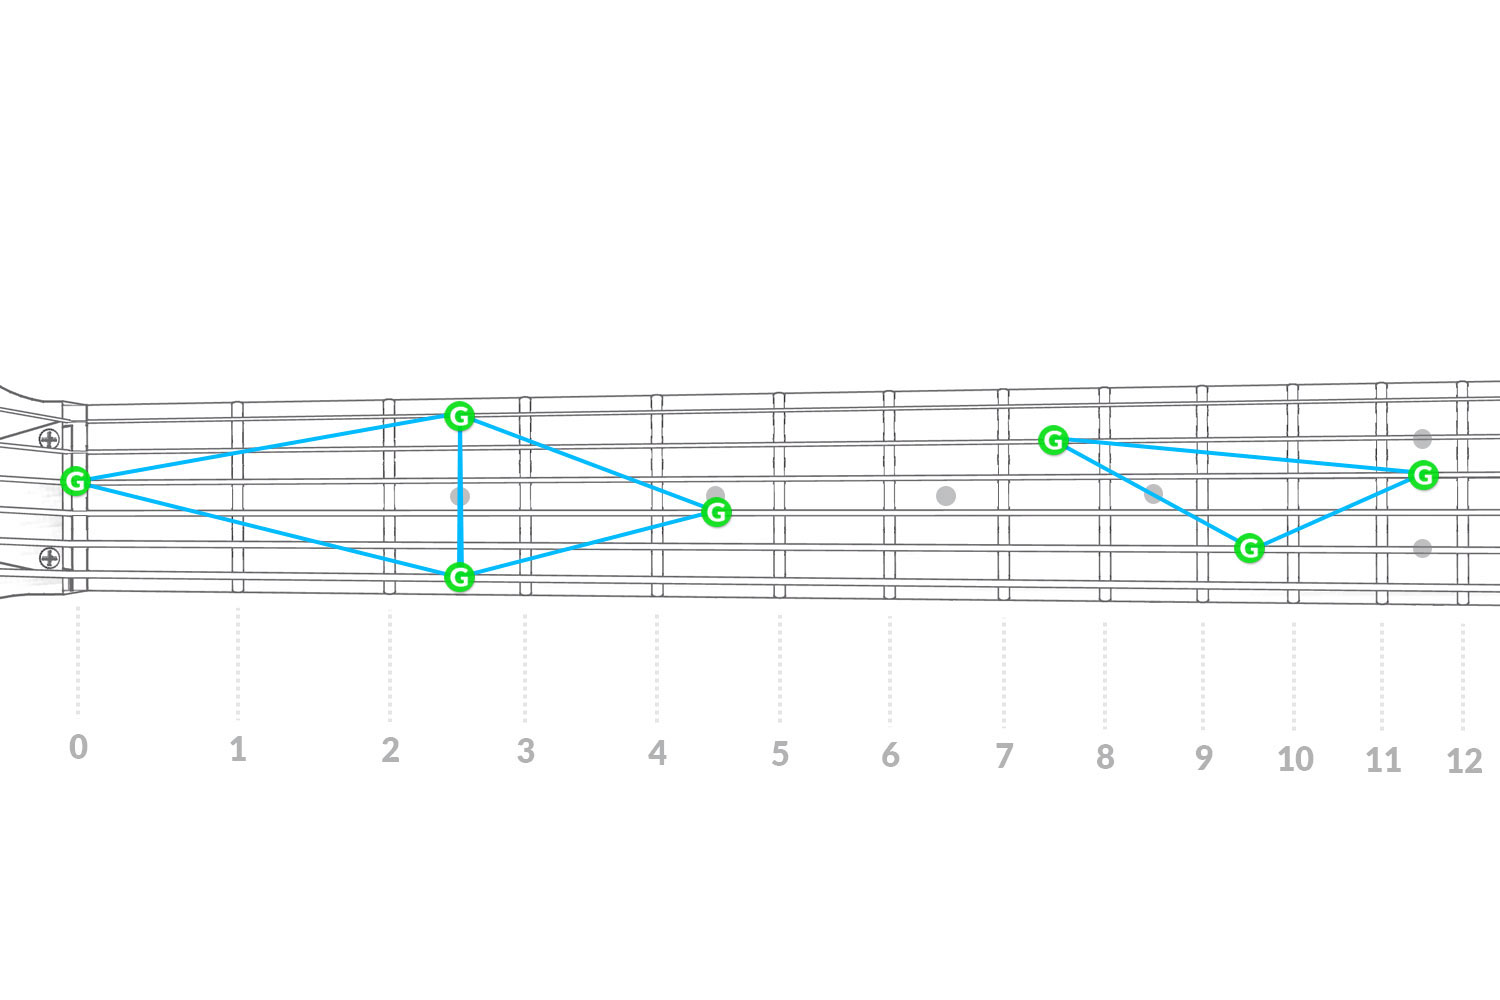
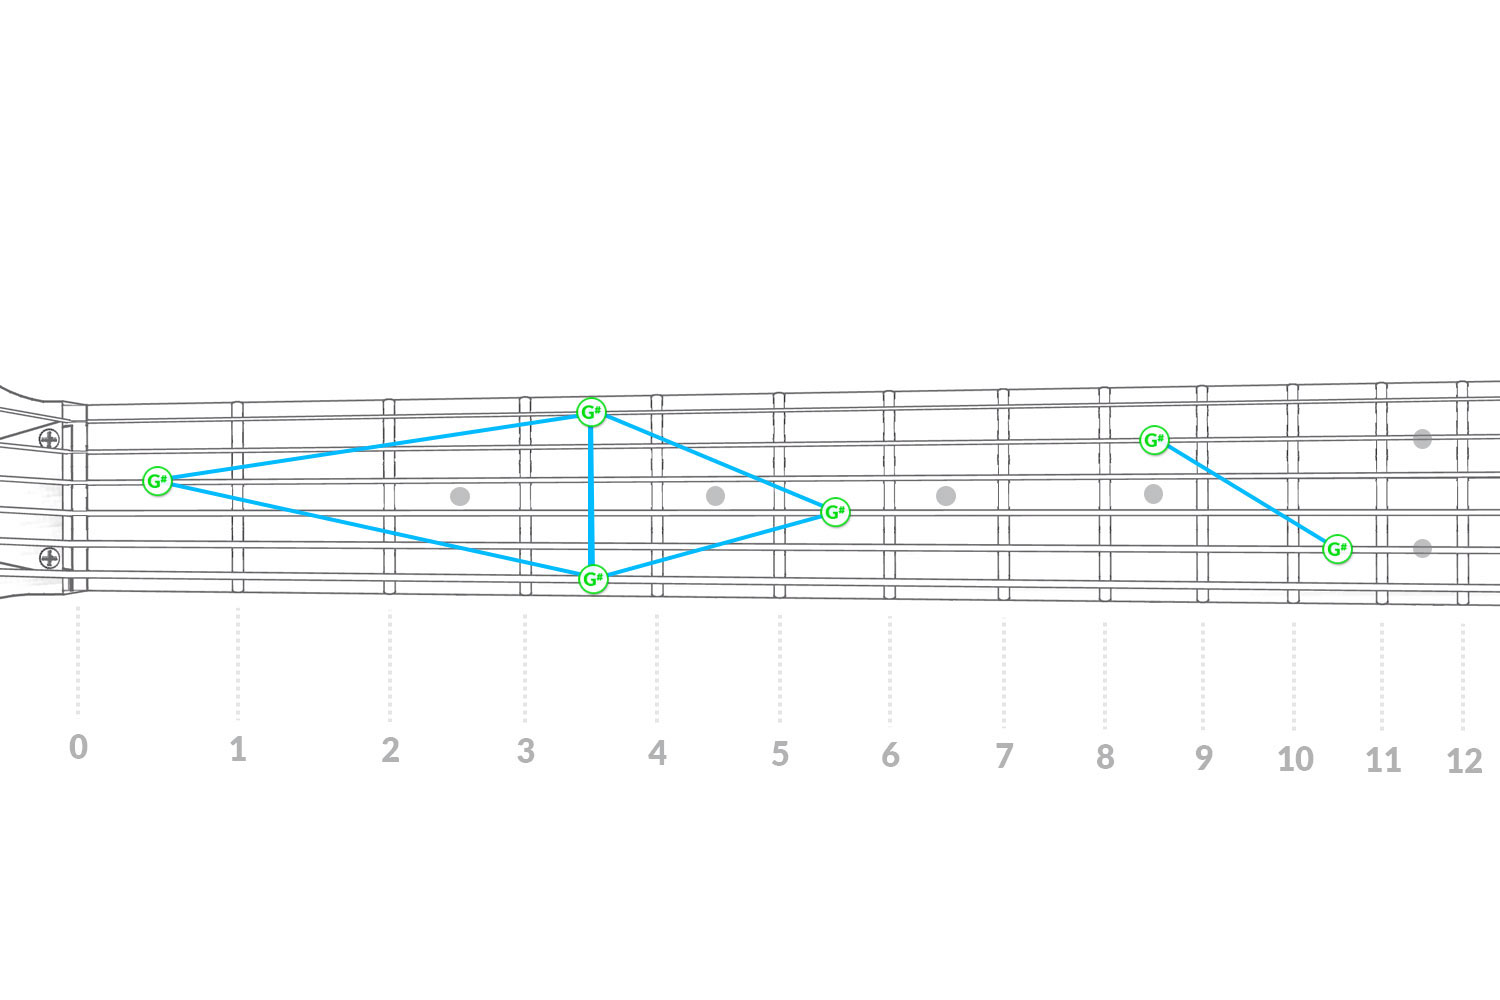
The patterns are already there, so I’ll waste no time and point them out – the diagram is using the C octave positions.
If we had an endless fretboard, this sequence of triangles would repeat forever, the notes do not deviate from this pattern in standard tunings.
Now, for the purposes of an actual 22 or 24 fret guitar, we have to take into account that there’s a beginning and an end so the patterns will occasionally break, but it’s really just the same three triangles moving back and forth depending on which note you’re focusing on.


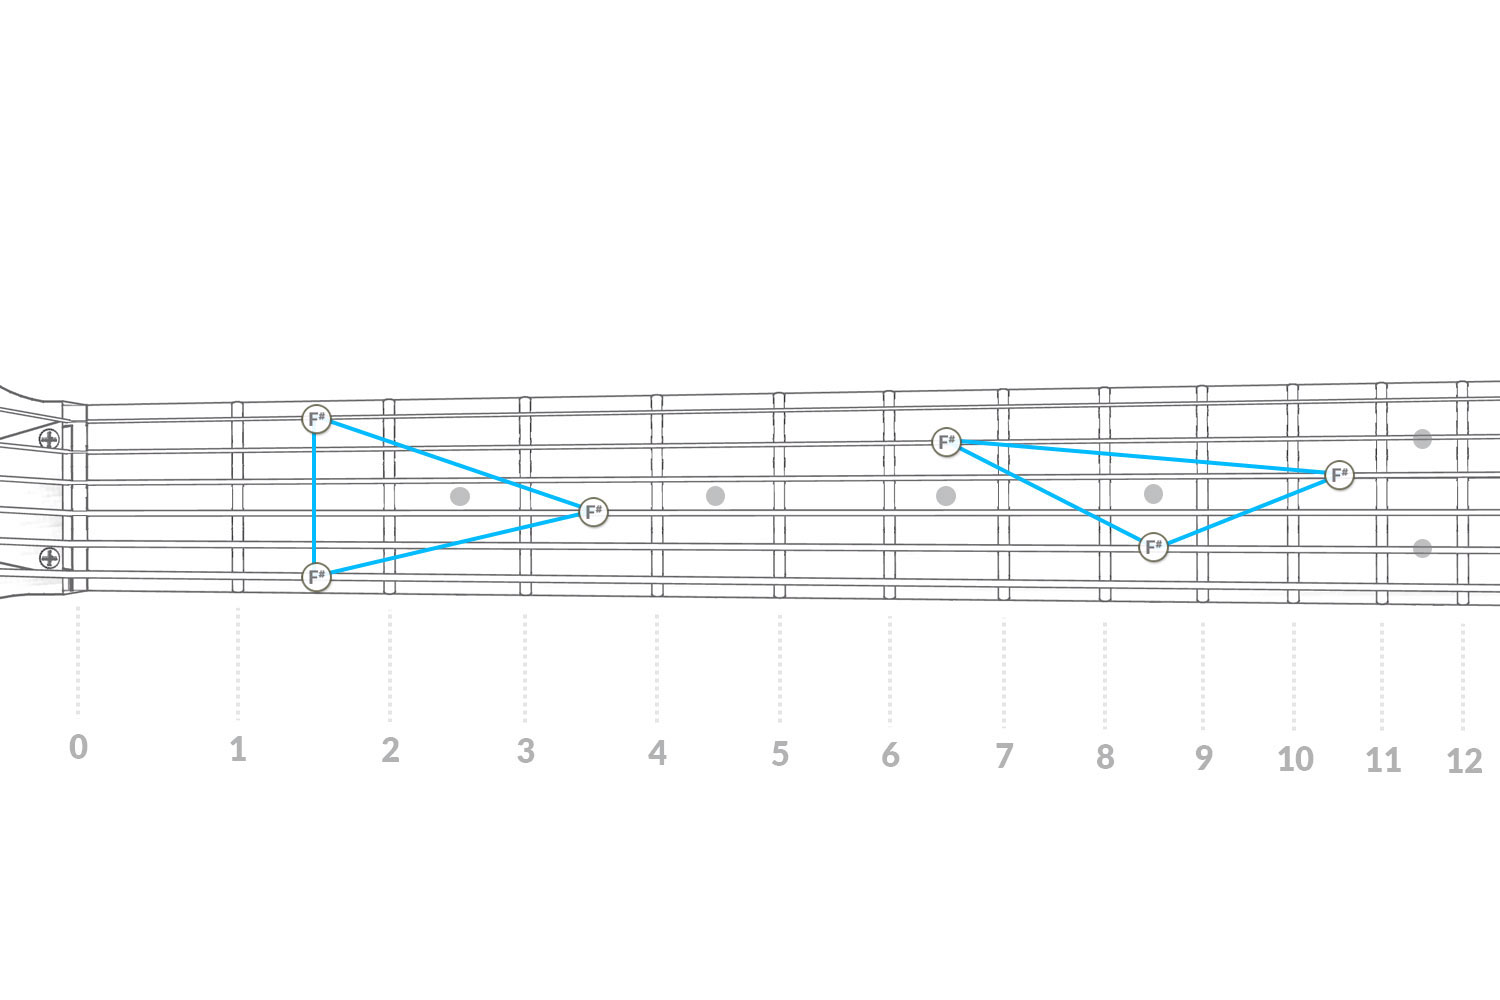
Take a look at the album below to see all of the patterns.
Tip: Click an image to open the album, then press your right arrow button (if on a computer) repeatedly to see the pattern shifting across the fretboard.


Part III: Practice Routine
The octave positions are split into 3-note patterns, with a maximum of four-fret intervals. The original video (provided below) goes into some very simple practices using the pattern, which should be just fine for beginners as well.
Once you’re feeling comfortable with things, the best way to challenge yourself is to mix up the sequence of notes you’re playing the patterns with. Focus less on repetition (as the video suggests) and more on improvising…I’ve made a random note generator below that spits out four note sequences every time you click, you can take it further by varying the shapes as well. For instance, for the first note you’ll play only the 2-fret shape, the 3-fret shape for the second note, the 4-fret interval for the third note, and then all three for the fourth.
Sequence Generator
Part IV: Final Thoughts
So, now you know these patterns exist and you’ve committed them to memory – what good does it all do though? Not a lot if you don’t make a little practice routine around them to build up your muscle memory.
The object is to be able to place your finger on any string on any fret and know what note it is [1], and subsequently know where all of the surrounding notes are as a result [2].
While goal #1 is going to take some time, this method will actually get you there much faster by focusing on #2 first. Even if you’re not committing note positions to memory, having an accurate image of where any given notes octave positions are is going to improve your playing so much.
- Faster improv abilities.
- Wider creative vision whilst composing and soloing.
- The ability to use previous theoretical knowledge or visual patterns in new applications thanks to seeing relations and octave positions easily.
- Understand music theory much more easily, provides a strong foundation for beginners.
- Ability to create chords / understand chord theory more easily.
The ability to visualize your guitar’s fretboard and build patterns and see relations based on just a few shapes all whilst building a theoretical foundation is quite a prospect – especially through such a simple process.