If you’re heading over here from the Lutherie Tools List article, you’re probably wondering if you can save a bit of money. The good news is, there’s a lot of things you can do to create your own tools. The bad news is that it requires a bit of ingenuity, as well as some prior knowledge of the tools in question and their function (if you’re looking to recreate them as best as possible).
However, there’s a few items on the list that some kind soul (the author speaking to you right now) has made available for you download and use with CNC machinery. It’s up to you to do your own programming and be aware of the limits of your machine. For instance, some items have etching more suited to laser diodes rather than router bits, and some are best made from metal or require parts from the outside world (mostly bolts and such).
Feel free to skip ahead if you’re looking for a particular tool:
1. Neck Caul
Neck cauls are pretty simple devices, but they’re absolutely integral if you’re performing any work on the neck. They provide support for the neck and fix the instrument in place while it’s on your table.
There are a few different variations out there, including a half-moon shape, a flat stationary model, and an elbow-type one that has two heights you can choose to prop the instrument up from.
Any cheap pine wood will do the trick for the main block of material. The scalloped seat is commonly covered with quark material, though rubber or foam will do fine. That’s something you’ll have to apply by hand afterward – a bit of glue and a razor are all that’s needed. The models include a 2mm layer of material for the sake of example.
Download CAD Model (GrabCAD) →
(Links open in new window)

2. Under-String Radius Gauges
These little devices are very useful when it comes to performing setups. Their main purpose is to provide a guide for saddle height adjustment whilst performing a setup after having completed the outer string action adjustments.
Technically, they’re not a necessary item for bridges that have a radius built-in, as many tune-o-matic style bridges have. However, as a luthier, it’s best to check the radius of any bridge that comes across your desk for a setup and compare to the radius of the fretboard. Sometimes people will swap hardware without realizing there’s a mismatch in the radius of the bridge compared to the fretboard. These under-string radius gauges can do over-string radius checking as well, thankfully. So you’ll get a lot of use out of them.

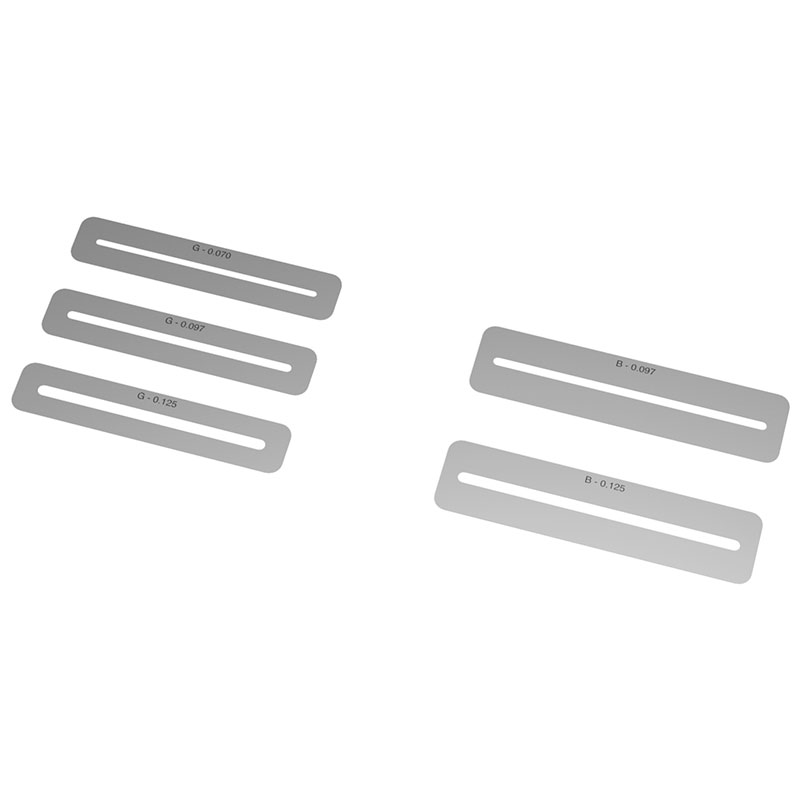
3. Fret Shields
Another stupidly simple device you can make at home – all you need is 0.01″ steel or similar. They’ve got to be very thin to give you access to the entire fret’s height. Their main purpose is to shield your fretboard from any damage, abrasion, or cleaning/polishing materials while performing fretwork. They cost about $20 per set normally.
This model set includes 5 shields – 3 for guitar, 2 for bass. They have different width fret slots to accommodate various wire sizes. The widths are marked on the plates at .1mm depth, if you feel inclined – a laser diode would be most suitable here.
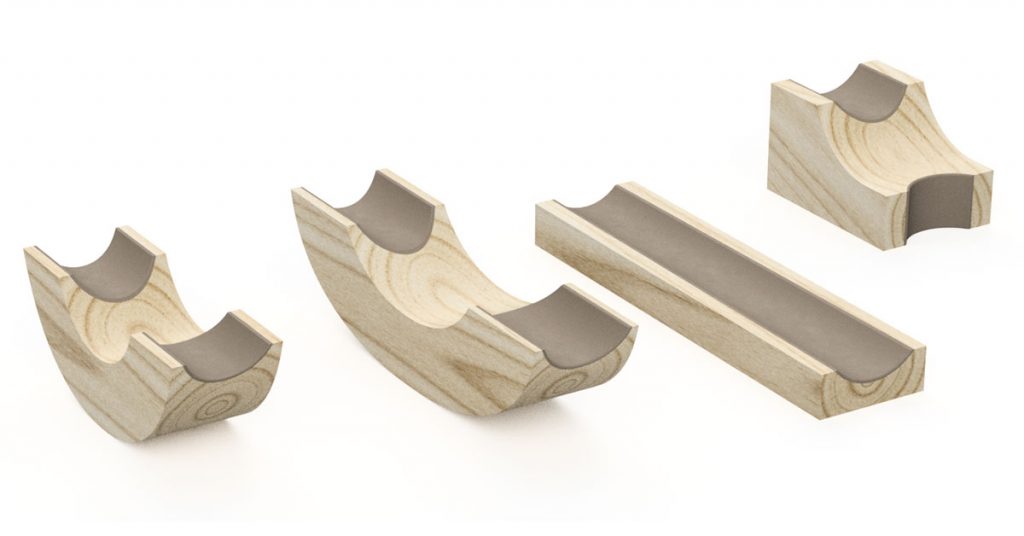
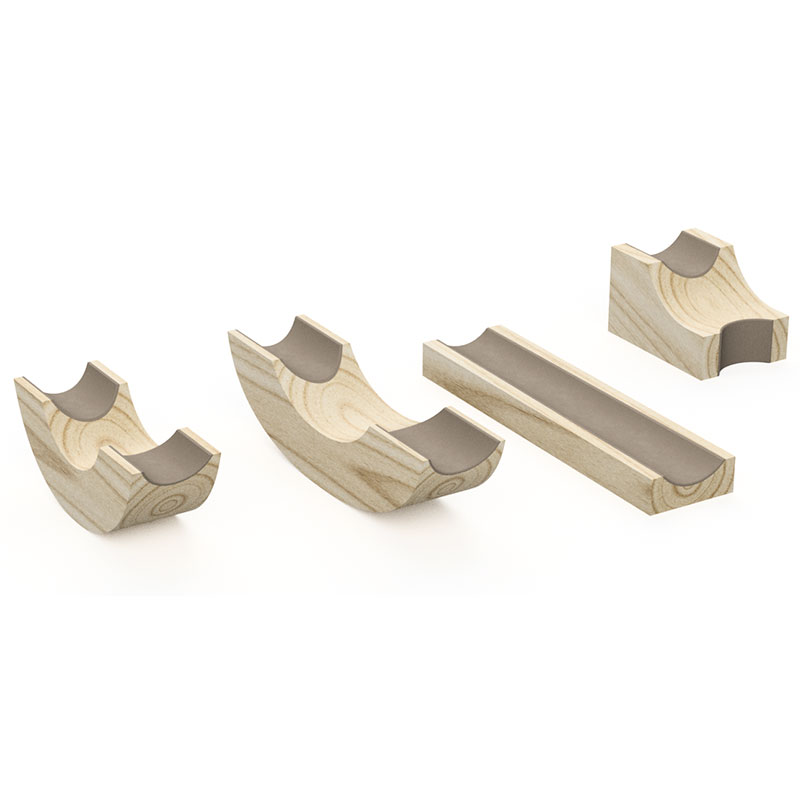
4. Radius Blocks
Famously overpriced lumps of wood. That’s what radius blocks are. Of course you’re welcome to make them out of something more sturdy if you’d like more longevity and durability.
These blocks come in two lengths: 8″ and 18″. They also come in 9 different commonly found radius sizes:
- 7.25″
- 9.5″
- 10″
- 12″
- 14″
- 15″
- 16″
- 17″
- 20″

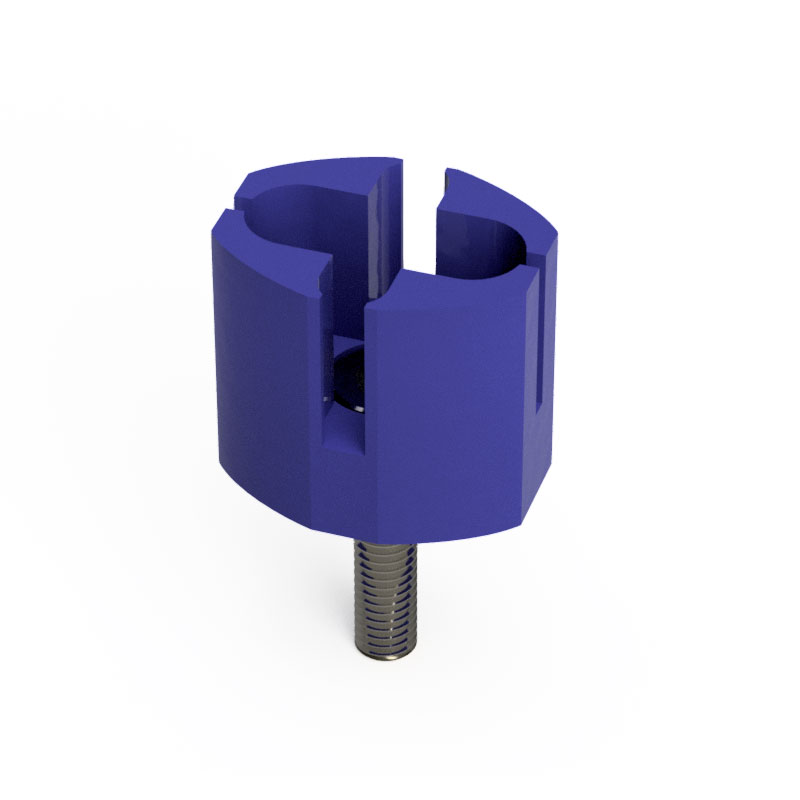
5. String Winding Attachment
Manual string winders aren’t actually that expensive, so feel free to be lazy and pick one up on Amazon. The automatic ones run about $20 though, which is fairly significant if you happen to have a drill lying around and a 3D printer or CNC machine.
The model provided was designed to be made with any 3-axis machine, no under-side work required. All you need is an M6 bolt with enough length to get in the chuck of your drill securely.
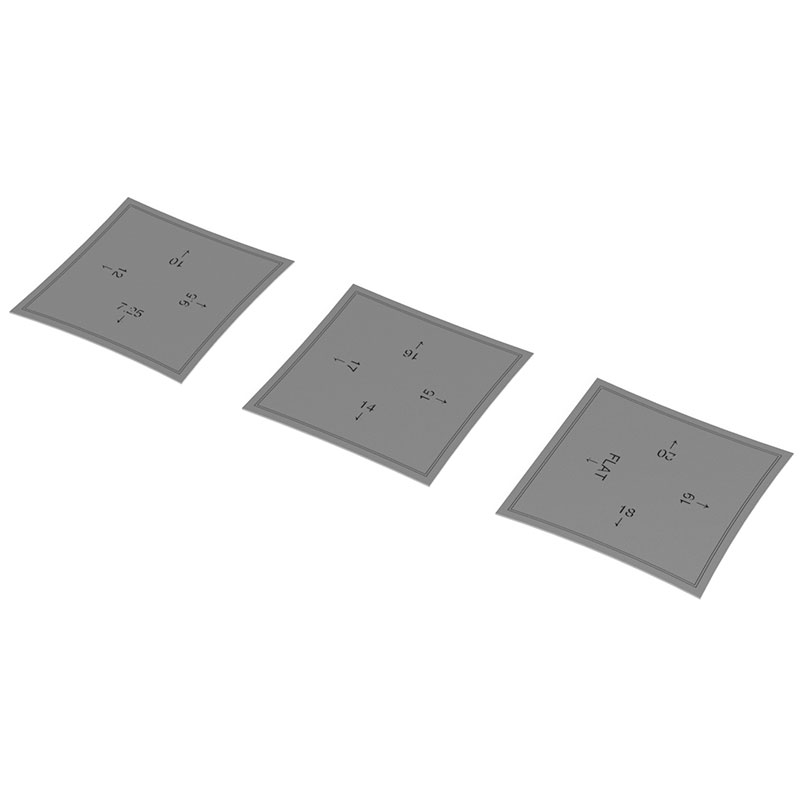
6. Fret Slot Depth Gauges
These are particularly useful during refret jobs when you’re uncertain of the slot depth. The material is 0.018″ (0.4572mm) thick, so it’ll fit in virtually any slot (most are around 0.023″, or just under 0.6mm).
The marking lines are at 0.006″ (1.524mm) and 0.0075″ (1.905mm) – you’ll find most fret wire tang heights are within this range.
There are 3 pieces (1.5″ x 1.5″) with the following radii:
- 7.25″, 9.5″, 10″, 12″
- 14″, 15″, 16″, 17″
- 18″, 19″, 20″, Flat
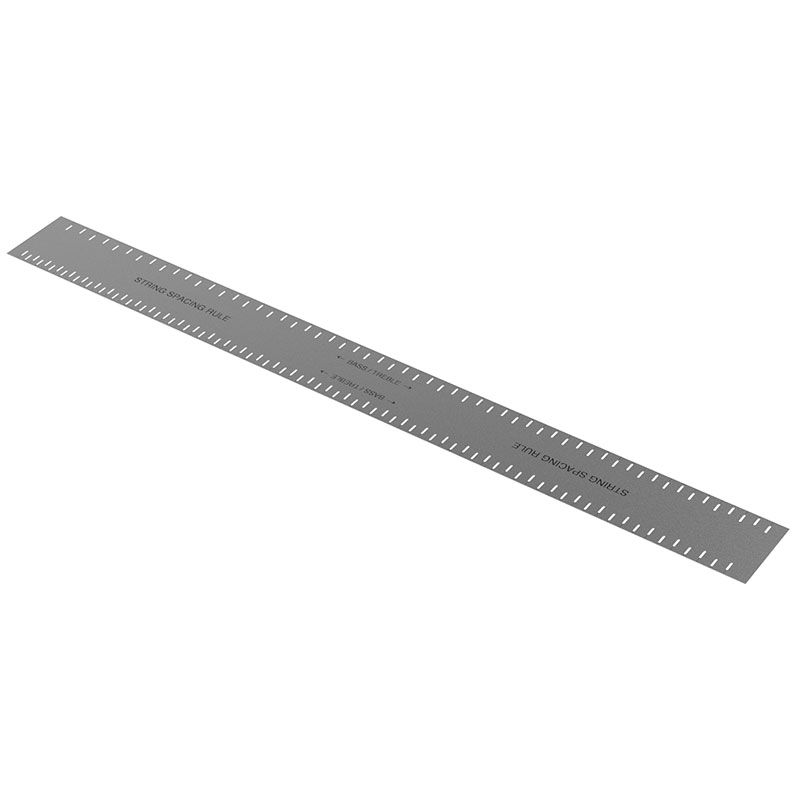
7. String Spacing Rule
These things go for about $30. Unless you’re sure of the precision of your machining process, you might feel more comfortable just buying one since they’re very important in the nut-making process.
The marking slots are 0.03″ (0.762mm) and spaced in increments declining by 0.001″ from bass to treble. The material being used should have some flexibility – this model uses 0.015″ (0.381mm) stock.
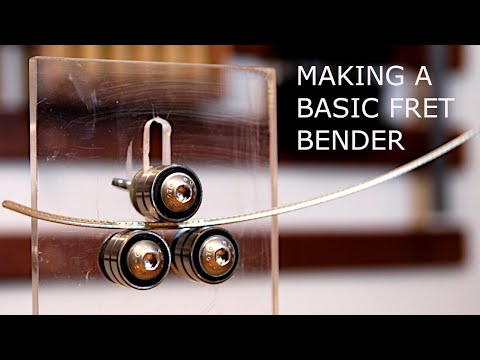
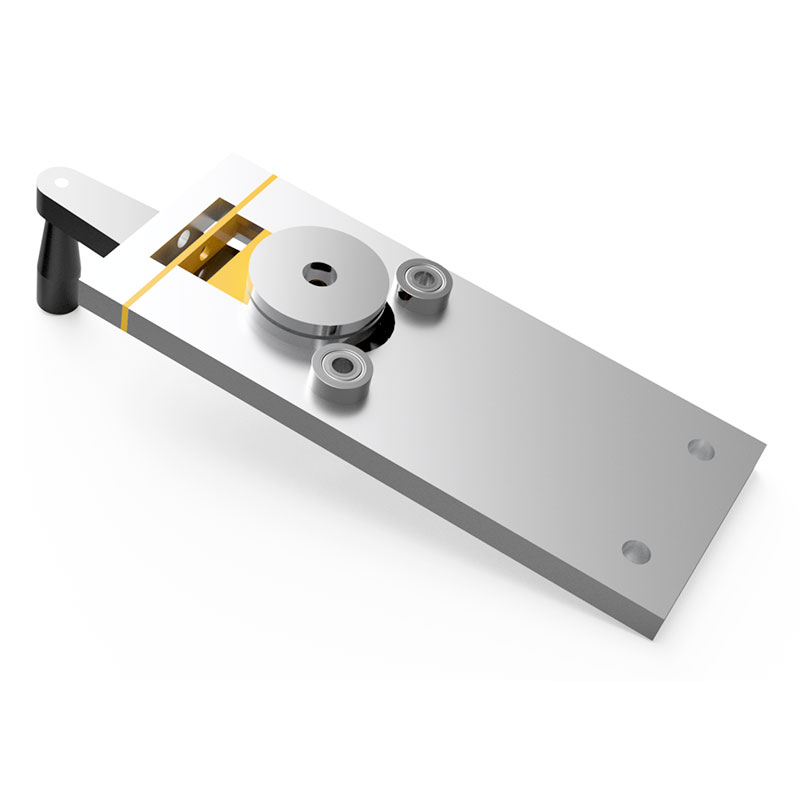
8. Fret Wire Bender
Note: this model was not made by Electric Herald
Before fret wire can be installed, it needs to be bent to shape. It should be bent to a radius just a tad smaller to that of the fretboard. There are a number of DIY solutions for this floating around out there, some more elegant than others.
The model you’ll find on the GrabCAD link below is for a device that resembles commercially available models. In fact, the author seems to sell them as well. If you’re in Indonesia, you can find his shop here or contact him on Instagram.
It’s worth noting that the model does not include bolts and wheels, though those can be gotten easily through Amazon or Alibaba.
An Even Simpler Option
As you’ll see in this video, these things don’t have to be too fancy:
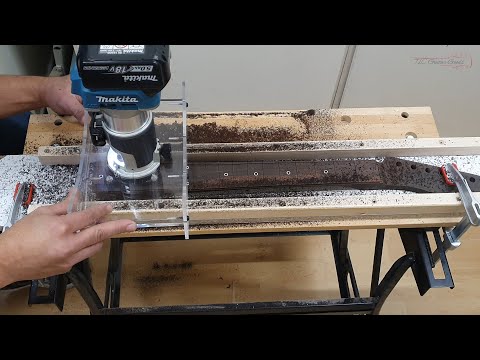
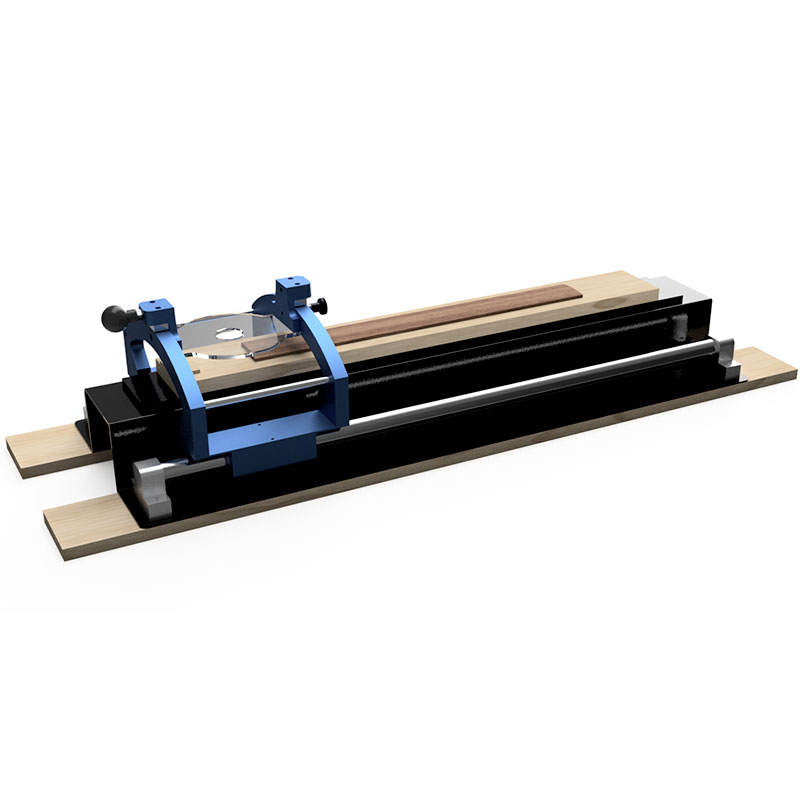
9. Fretboard Radius Jig
Note: this model was not made by Electric Herald
There’s a lot of variations on this device out there, so feel free to do some Google searching if you don’t like what you see here. There are also a few systems available to purchase ready-made.
This particular model uses a linear sliding system that seems to have original shaft holders you’d have to machine yourself. If you’re looking to minimize your build time and still save money making this, there’s a ton of ready-made parts from China for linear motion. For instance, if you head over to www.cnyouright.com and look through their catalogue, you’ll be able to make your own suitable slide system to build off of. Just make note of the part numbers and type them into Alibaba or Amazon’s search bar. They’re very cheap and very functional.
For a slide system like the one found in this model, you’d need the following:
That’s it! That’s a basic two-sided linear shaft system that’ll allow you to slide a router base up and down the length of the fretboard. Be sure you choose a shaft diameter that’ll provide stiff support for the weight of your router & base over the length of the work area. Maybe about 12mm would be a good choice – a starter model set can be found here. You could alternatively use a rail system to slide the fretboard itself back and forth, feeding it to the router instead of the other way around.
The most frustrating thing about all of these systems is changing out the radius guides for the router base to trace. If you’re designing your own, make sure you’re thinking modularly. And give yourself easy access to any bolts you’ll be dealing with frequently, at the very least.
An Even Simpler Option
The video you’ll see below is advertising for a system you can purchase, but it serves very nicely as inspiration for an alternate design of your own: