Perhaps one of the most overlooked (or unrecognized) features of a guitar is its neck profile. For many guitarists, the specific shaping of their guitar’s neck isn’t on their list of specifications when describing their needs. The reason for this is because it’s simply not sold as a critical feature. Also, because most guitarists have never actually sat down and had a real life comparison of the various neck profiles to determine their preference.
The fact of the matter is that, as a player, your guitar neck’s profile can have a profound effect on the way you play. Not the way the guitar functions, not the tone, but the way it feels.
As a luthier, it can sometimes be tough to get a confident answer about neck profile preference from a client discussing their needs. This guide will provide you with everything you need to give them a quick, effective education on the matter. Including real-life examples.
On the other hand, you have some clients who have a very specific idea of the shape they want. What if they want a 1968 Telecaster U transitioning to a ’75 Peter Frampton PRS Pattern neck at the 14th fret?

Without an encyclopedic knowledge of particular brand profiles throughout the years, you may find it impossible to please this client. We don’t have time to analyze every manufacturer’s profiles, but you will certainly have a solid base to draw from after you finish here!
What is a neck profile?
To put it simply, it’s the shape of your guitar’s neck from the nut to the start of the heel transition. The default shape on a prototypical guitar is a simple semi-circle. The term “profile” refers specifically to the cross sections of the top (nut area) and bottom (heel area) of the neck. Variations in shape and size of the two cross sections can give a neck a new feel, a different playability.
The cross sections are important for design & construction purposes. They’re simple 2-dimensional representations of a shape that is difficult to discern otherwise. This is because the differences are subtle and almost impossible to see when sighting down the length of the neck.
With two cross sections, a luthier can create profile templates (wooden negatives to place on the neck as it’s being shaped). They can also be used to generate 3-dimensional guitar necks using lofts to create a natural transition between the two.

As a guitar player, feeling the neck is all you need to do to determine your preference. As a luthier, recreating a neck profile may actually involve cutting a neck into pieces to trace the cross sections.
There are various shapes that have been manufactured by companies large and small over the years. There are also millions upon millions of players who have played them and have preferences. One man may say he prefers a ’73 Tele neck over a ’95 – same shape, same frets, same scale. Different profile.
Let’s take a look at the most common shapes and their reported qualities!
The neck shape alphabet
The current system of neck profile nomenclature uses single letters to describe profile shapes. As you may have expected, Fender is responsible for popularizing this categorization method. Their profiles fell into 3 main groups originally: C, U, and V.
There was some confusion amongst players regarding which profiles were associated with which models early on. Many discovered letters stamped at the ends of their neck heels and assumed they were denoting profile. Fender had this to say on the matter:
There is occasional confusion about C, U and V neck profile designations and A, B, C and D neck width designations. From the early ’60s to the early ’70s, Fender referred specifically to the nut width of its instrument necks using the letters A (1 ½”), B (1 5/8″), C (1 ¾”) and D (1 7/8″). These letters were stamped on the butt-end of the necks, and have nothing to do with neck profile.
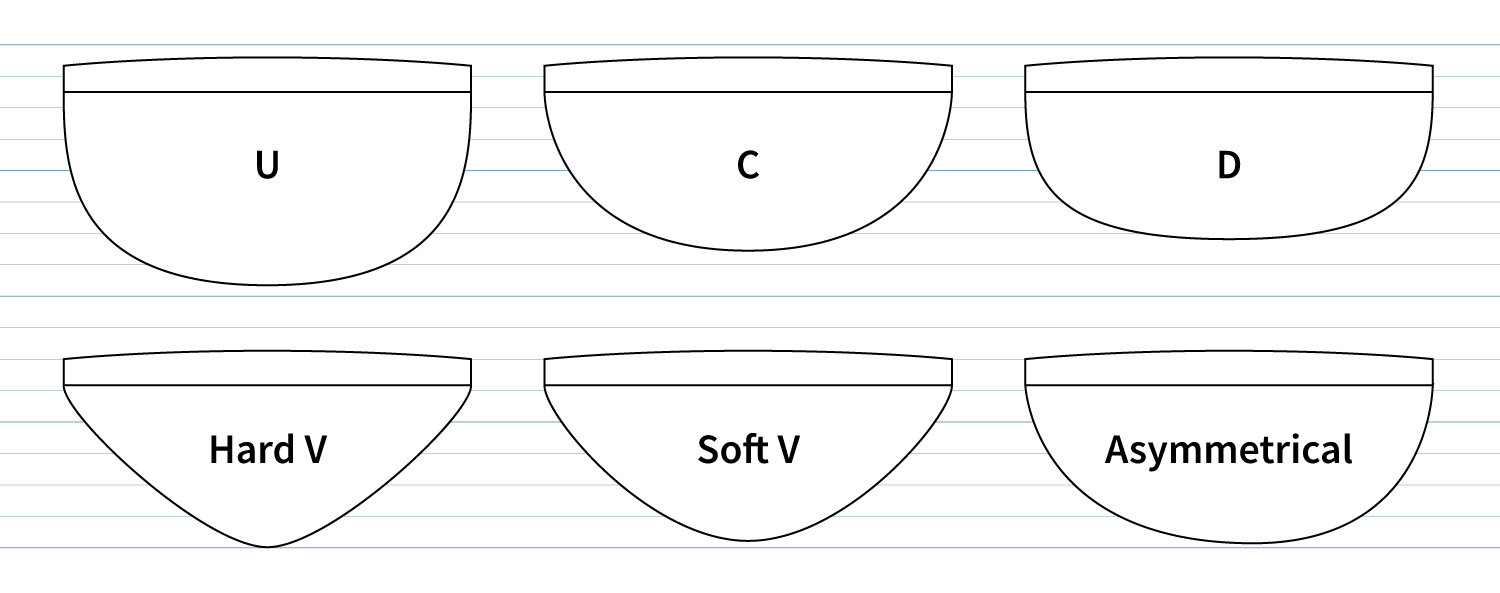
Before we said the default neck profile on a prototypical guitar was a semi circle. This shape has come to be known as the C profile, for obvious reasons. And from there, you can understand how the V, D, and U profiles came to exist. These profiles, along with a few others, have near endless variations based on neck thickness, fretboard profile inclusion, scale, symmetry, and other factors.
There are a number of high profile instruments with asymmetrical necks out there – they’re very well liked by some players. Some manufacturers have their own unique profiles that can be considered in their own class.
As a guitarist, you can come to expect a noticeable difference between each profile variation – some more than others. With different playability and feeling comes different playing. That’s why neck profiles are such critical features.
C Profile
The standard semi-circle shape that can be found on most electric guitars, past and present. It always gets the job done – and it’s not a square, so that’s nice. Everyone should be familiar with the way a C profile feels, so it serves as a great baseline for comparison.
Occasionally, you may find some vendors or players referencing a “deep C” profile. This is a shape that could easily be mistaken as a U profile – there is a difference though:

U Profile
As mentioned above, the U profile is very similar to a C profile in general shape – just much deeper. They also usually have visible vertical shoulders. Many necks that utilize a U profile will be branded as fat, heavy, or some similar term.
The U profile is great for players with larger hands. It provides a very comfortable surface to perform chord work from, regardless of hand size.
V Profile
If you’ve never played a V profile, you may feel apprehensive to even give it a try. The flat planes appear as if they’d limit your hand’s rotation around the back of the neck. You’re not wrong to feel that way – many modern players have found the shape incompatible with their range of movement.
But, for a certain type of player, it’s the only way to go. Blues guitarists, like Eric Clapton, and guitarists who position their thumb over the top of the fretboard find the V shape most appropriate. Apparently, the V shape is conducive to a twangy sound – there are no peer-reviewed studies on the subject, however.
There are three variations on the V shape – Hard V, Soft V, and Medium V.
D Profile
If you read the introduction to this guide, you’ll know that Fender’s original profile nomenclature did not include a “D” shape. They have, however, adopted it for use in many of their modern instruments – the Custom Shop will gladly make you one if you’re wanting to update a classic.
The D profile is usually wider than your standard C-shaped neck, and always flatter on the bottom (making it thinner to hold). Some players find the flattened underside makes the neck feel much faster in the treble range. It certainly makes playing a wider neck more tolerable – not unlike a classical guitar’s neck shape.
To get the best of both worlds, Fender’s custom shop began offering a C to D transition neck. This would allow for easier chord work on the bass end (C), and easier runs on the treble end (D). It’s a very cool modification, but transition necks aren’t everyone cup of tea so try it before you buy it.
Asymmetric
This category doesn’t specifically reference a particular shape since any profile can be made asymmetrical. For the most part, a C shape is used as a base from which asymmetrical designs are made.
The object is to create a neck that plays easily in both treble and bass ranges, or for fast runs and comfy chords. This is achieved by thinning the treble side of the profile and thickening the bass side (or leaving it unaltered).
The diagram examples of asymmetrical necks usually represent some pretty drastic transformations. But it’s more commonly quite a subtle effect. Gibson and PRS, for example, feature their own asymmetrical profiles that stay on the mild side.
Quite a few guitarists adopt this ergonomic neck style for their signature guitars. Eddie Van Halen would be the biggest name on that list.
Transition Necks
Just a quick note – a transition neck refers to the profiles at either end of the fretboard length. It’s entirely possible to have a compound transition neck. For example, a C profile at the nut which slowly transforms into an asymmetrical D profile favoring right-hand players.
Neck Profile Templates & Construction Resources
You’re all caught up on profile nomenclature and anatomy now, so it’s time to start working with them. Below, you will find 2-dimensional and 3-dimensional downloadable resources to assist in the fabrication process. Formats are suitable for hand-built instruments (PDF, printable) and CNC-machined instruments (DXF/STEP, CAD formats).
Note: the resources below are 100% based on Fender instruments (as most of this article has been). There are some profiles available for other manufacturers online, but very few are 1:1 scale or vector format. After finishing this article, however, you should have everything you need to design your own!
If you’re working by hand, you should have a little experience in neck shaping before trying to work in more complex profiles.
This isn’t a neck-shaping guide – there are plenty of those around the web though. There are also a number of methods for shaping (or profiling, as some call it) a guitar neck. Whilst training as a luthier, your author learned to perform the sheering process using a profiling jig, a shinto, and his eyes. Some people prefer to use traditional rasps or specialized hand planes. Routers are not unheard of either, as this character will show you (YouTube video).
It appears daunting at first, but shaping the neck is actually the best part of the build for many luthiers. Some may even find it relaxing.
When you have a specific profile, however, you’ll need to check your work frequently. Eyeing your neck profile as you go to ensure your sheering is accurate is perfectly doable. But when you’re working to a specific set of thickness dimensions or making a transition neck, you’ll want to use templates.
Manual shaping requires your neck to be completely stationary – there are numerous neck shaping jig designs available online.
Neck Profile Templates
First, let’s take a look at what Dan Erlewine has made for us to copy off of:

These little neck profile templates can be purchased from StewMac here, and come in a variety of shapes. They’re made to recreate profiles of specific guitar models. To use them, you simply pause your rasping/planing every once in a while and fit the template over the neck at the specified fret point. The object is to get a perfect fitment at three points along the board, with your transitions between them being natural and smooth.
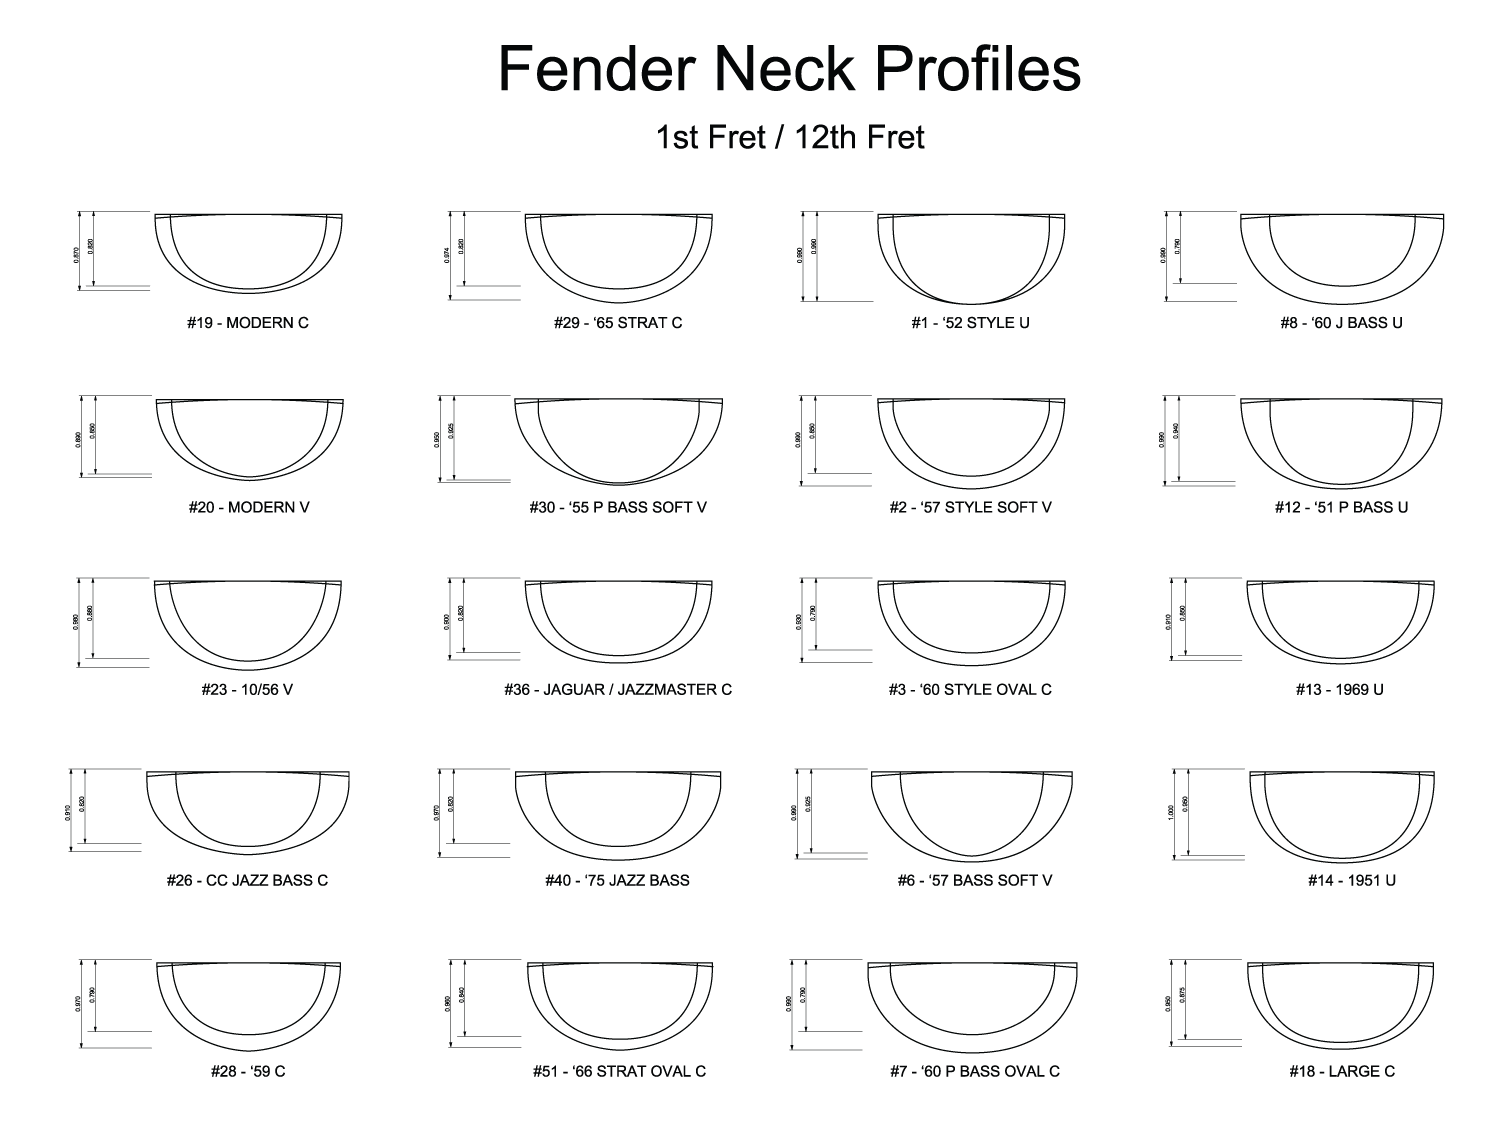
As a custom guitar builder, you’ll probably have a need for more options than StewMac offers. If you’re the DIY type (you must be if you’re on this site), we’ve made an adapted set of 1:1 scale Fender neck profiles:

Download: PDF | DXF | AI (Adobe Illustrator)
Neck Profile CAD Models
For those of you who prefer profiling in CAD for CNC machining, we have some models for you below. The assembly files contain various Fender guitar necks from the templates above. Each model has a 25.5″ scale, 24 frets, and 1-11/16″ (43mm) nut. While the scale length and nut width are common Fender standards, 24 frets is not. Luckily, you can always chop the end off for less frets.

Download: F3D (Fusion) | STEP


![Top 20: Best Electric Guitar Kits [2021] best-electric-guitar-kits-fb-img](https://www.electricherald.com/wp-content/uploads/best-electric-guitar-kits-fb-img.jpg)
![Guitar Repair Tools Guide [Purchase List - 2020] Guitar Repair Tools Guide [Purchase List - 2020]](https://www.electricherald.com/wp-content/uploads/2016/12/A011-Facebook-Image.jpg)

